Everyone looks at what is going on in Pinterest, and says..... "I want that".... We repin it and talk about it, but never do it... or PIN anything of our own. They say for every 10 things you RE-PIN you should pin something of your own. So I am stepping up to the challenge.... Enjoy my attempt from my board. "ORGANIZATIONAL HEAVEN"
Okay, I have this............  |
| My current laundry area. |
 |
| And this is how I hang clothes when I am done, behind me. But this is what I WANT above my Washer and Dryer. |
 |
| So what's a girl to do!!!! But build her own! |

I purchased
2 1x3x6 #2 Top Choice Wood for 2.03 each=4.06
2 1/4 x 3 3/4 Eye Screws at .43 each=.86
4 1 1/4 white safety clip screws at .88 each=3.52
2 7/8x48" dowel rods at 2.68 each=5.36
1 length of Chain#3x15' for 6.48 (this is .43 a foot) I could have purchased it by the foot for .49 cents, but I wanted the extra in case our ceilings were different heights as we move around or maybe use it to hang potted plants or kids stuff outside!
I had at home
7x 1 1/2 black cabinet screws
Cordless Drill
Drill bits
7/8 sink bit
Phillips screwdriver
Table Saw
So they did not cost me anything at this point.
Total Spent (before tax) $20.28
 |
| Made sure I had all my supplies in one place. I did not need the screwdriver or table saw inside so they are not in the picture. |
 |
| Cut my dowel rods to 12". Then I lined them all up with the shortest dowel and cut them all at once. My finished measurement was 11 3/4" |
 |
| Then I took out the hangers I knew I would be using and sized where they needed to go. As My kids grow I may need to adjust, but for at least the next 3 years, this shall work. |
 |
| Next I used a marker to center out where I needed each dowel. |
 |
| Put in a smaller drill bit than your screws charged or plug in drill. |
 |
| A smarter and more patient person than me would clamp these together and go into the garage or in a work space other than their kitchen to drill thru BOTH sides at the same time. I however used my lap in the kitchen and got sawdust in my shoes and all over my rugs!! Price you pay!! |
 |
| Next you lay both pieces down. Outsides out. Again a smart and patient person would have marked inside and outside top and bottom so they don't get them confused.... this could cause problems later. However I escaped the problem part, this time. Using your 7/8" sink bit, or what ever size that will snuggle fit your dowel rod, mark a line on the bit for how deep you want to go. This will keep all your holes the same depth and none off the bars will be too long or short later. Drill the outside. This will get rid of the "marking" dot you made and the "jagged" wood from where you came out the back side with the drill bit. Should leave the piece rather smooth. Do all the holes on both pieces. |
 |
| Lay it out and get your screws and drill ready. |
 |
| On one side attach the dowels. Hold the dowel FIRMLY and put in the screw SLOWLY. This will allow a snug fit. You may have to come back and do it a second time or even after it is finished. |
 |
| This is what it will look like. |
 |
| Now put the screws in the holes with a simple twist of your hand so they are in place. Line up the dowels and secure them by each end, then middle then out from there. This seemed to be the hardest part. If I didn't sink in enough or too much, then I had trouble getting the bars lined up because one was too short. I adjusted my holes, which is why I stated to mark your bit above, hopefully that does not happen to you. |
 |
| Now for the details. |
 |
| Using a small drill bit, I started my hold and put in all 4 of the safety clips. |
 |
| This is the ceiling above my washer and dryer |
 |
| I brought with me a drill with a large bit for the eye screws and a screwdriver to turn the eye screws so it would be easier on my hands... (they are swollen today as you might have noticed and are not fond of this work sometimes!) I have the chain and wire cutters in case I want to cut the chain. I chose not to in the end, I just wrapped it around. |
 |
| This is who you turn the screw with the screwdriver to make it easier, once you get it started by hand. |
 |
| I threaded the chain thru the two eyelets. |
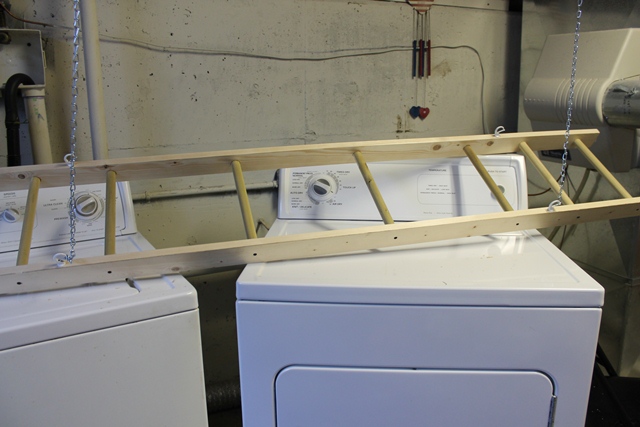 |
| Hooked the ends to one side of the ladder/shelf. If I were a super smart girl, I might have made this a pulley system, since I am only 5'2" on a good day. Then I could have dried sweaters on top too!! |
 |
| Finally, I found the correct length and counted the chain links out like I did as a kid on the swing set for the other side. |
 |
| There was extra chain but since I chose not to cut it, I used it to wrap around and make sure the chains stayed on the white safety hooks. |
 |
Enjoy and good luck creating your very own.


