Monday, March 12, 2012

Keeping up with Pinterest!

Everyone looks at what is going on in Pinterest, and says..... "I want that".... We repin it and talk about it, but never do it... or PIN anything of our own.  They say for every 10 things you RE-PIN you should pin something of your own.  So I am stepping up to the challenge.... Enjoy my attempt from my board. "ORGANIZATIONAL HEAVEN"  
 Okay, I have this............ 
My current laundry area.
 
And this is how I hang clothes when I am done, behind me.

But this is what I WANT above my Washer and Dryer.
So what's a girl to do!!!!  But build her own!
 I went to our local hardware store (Lowes)

I purchased
2 1x3x6 #2 Top Choice Wood for 2.03 each=4.06
2 1/4 x 3 3/4 Eye Screws at .43 each=.86
4  1 1/4 white safety clip screws at .88 each=3.52
2 7/8x48" dowel rods at 2.68 each=5.36
1 length of Chain#3x15' for 6.48 (this is .43 a foot) I could have purchased it by the foot for .49  cents, but I wanted the extra in case our ceilings were different heights as we move around or maybe use it to hang potted plants or kids stuff outside!
I had at home
7x 1 1/2 black cabinet screws
Cordless Drill
Drill bits
7/8 sink bit
Phillips screwdriver
Table Saw
So they did not cost me anything at this point.
Total Spent (before tax) $20.28


Made sure I had all my supplies in one place.  I did not need the screwdriver or table saw inside so they are not in the picture.

Cut my dowel rods to 12".  Then I lined them all up with the shortest dowel and cut them all at once.  My finished measurement was 11 3/4"
Then I took out the hangers I knew I would be using and sized where they needed to go. As My kids grow I may need to adjust, but for at least the next 3 years, this shall work.
Next  I used a marker to center out where I needed each dowel. 
Put in a smaller drill bit than your screws charged or plug in drill. 
A smarter and more patient person than me would clamp these together and go into the garage or in a work space other than their kitchen to drill thru BOTH sides at the same time.  I however used my lap in the kitchen and got sawdust in my shoes and all over my rugs!!  Price you pay!! 
Next you lay both pieces down.  Outsides out.  Again a smart and patient person would have marked inside and outside top and bottom so they don't get them confused.... this could cause problems later.  However I escaped the problem part, this time.  Using your 7/8" sink bit, or what ever size that will snuggle fit your dowel rod, mark a line on the bit for how deep you want to go.  This will keep all your holes the same depth and none off the bars will be too long or short later. Drill the outside.  This will get rid of the "marking" dot you made and the "jagged" wood from where you came out the back side with the drill bit.  Should leave the piece rather smooth. Do all the holes on both pieces.
Lay it out and get your screws and drill ready.
On one side attach the dowels.  Hold the dowel FIRMLY and put in the screw SLOWLY.  This will allow a snug fit.  You may have to come back and do it a second time or even after it is finished.
This is what it will look like.
Now put the screws in the holes with a simple twist of your hand so they are in place.  Line up the dowels and secure them by each end, then middle then out from there.  This seemed to be the hardest part.  If I didn't sink in enough or too much, then I had trouble getting the bars lined up because one was too short.  I adjusted my holes, which is why I stated to mark your bit above, hopefully that does not happen to you.
Now for the details.
Using a small drill bit, I started my hold and put in all 4 of the safety clips. 
This is the ceiling above my washer and dryer
I brought with me a drill with a large bit for the eye screws and  a screwdriver to turn the eye screws so it would be easier on my hands... (they are swollen today as you might have noticed and are not fond of this work sometimes!)  I have the chain and wire cutters in case I want to cut the chain.  I chose not to in the end, I just wrapped it around.
This is who you turn the screw with the screwdriver to make it easier, once you get it started by  hand.
I threaded the chain thru the two eyelets.
Hooked the ends to one side of the ladder/shelf.  If I were a super smart girl, I might have made this a pulley system, since I am only 5'2" on a good day.  Then I could have dried sweaters on top too!!
Finally, I found the correct length and counted the chain links out like I did as a kid on the swing set for the other side.
There was extra chain but since I chose not to cut it, I used it to wrap around and make sure the chains stayed on the white safety hooks. 
 Getting them up the stairs.... Well that is a whole other battle, I don't have the energy to deal with today!!

Enjoy and good luck creating your very own.

Tuesday, February 7, 2012

I got to Card Make.... it was fun!

So finally.... I have been trying to get into a group like this for years..... I am in!!!
Stampin Up Technique card group!  We meet once a month, have a minimun purchase and rotate who is the host!!  It is amazing! 

This week was our first get to gether.  We made a stamped decopauge box and 4 2x2 Hello cards!

So wonderful.  If you follow me and want to order something from Stampin Up but no longer have a demonstrator.  Let me know.  I will be happy to put you on the March order, because that is the month that I... ME.... Heather Mae is the hostess and I get credits to get more STUFF with!! 

Ill have more info to come, check out my demonstrators website too.
The class is on March 6th and I will close out the show one week following.  Items should be heading to you within the next week... depending on Spring Break and which state I will be in.

Have a great day and stay warm!

Monday, January 16, 2012

Theme Birthdays!

Okay, I know I said that after my kids turned 5 that I would no longer do a "themed" birthday party.  But as I see their interest grow and see everything that is out there for them I just can't help it. On that note Braxton is turning 7 and he is really into


So, In my spare time.... LOL, really I don't have any of that, so what I really mean is.... I though this was important enough to set other things aside and make it a memory for him AT THE LAST MINUTE.  He may not appreciate it now, but when he looks back, I hope he will draw up some of these memories.  Plus he helped me make the cakes!!

First I  scrambled for an invite for a couple friends.

(downloaded FREE digital Star Wars kit from Kinleys Scraps)
Now here is his cake!  (downloaded from the brain of Heather....watch out!)  He is all about the Dark Side.  So we found this great Darth Vader candle holder and I wanted to try and make it looks like he was on the platform fighting Luke!  After I finished Scott told me that the glow from that area was RED, so you will need to use your imagination!

And it goes around!!
And around!!
And Around!!
Brax May the Force be with you!!

Then I flash back to a moment when he told me he had Jacob's R5D4 and we had to look everywhere before Christmas to find one because out of the blue he wanted on.  So I asked him what sounds did R5D4 and R2D2 make... I only wish you could have heard what I did!!!  But with closed mouth and BIG BIG EYES... is was like Meeep Mooop Meop Be Bot.... Or something like that and I just fell even more in love with that blue eyes blond haired angel. So in honor of a memory and sound I will never forget... The guests at his part get their very own R2D2!!

Close up you ask... Sure!


And yes that is a red gumball ! 
They are not even close to professionally made, but they are made with love.

So May the Force be with YOU!  And have a wonderful day... Now I am going to go get my Laser Tag on and show some 6/7 year olds how it is done!!


Monday, December 5, 2011

Gone for Soooooo Long

I am blown away at how crazy and fast paced life can get.  I see that my last update was August 27th.  Over 3 months of going 90 to nothin.!!  So glad that things are slowing down some.

Currently I am working on some swags, AF ornaments and memorabilia and thought I would share! 


I decided to try my hand at the Cookie Sheet Magnet board
On this one. I used travel paper and bright colors.

The Magnets are the Days of the week and I used jumbo stones
that I got from Michaels with a 3/4"magnet on back.

Aleens tack glue on the magnet and clear glue on stone..


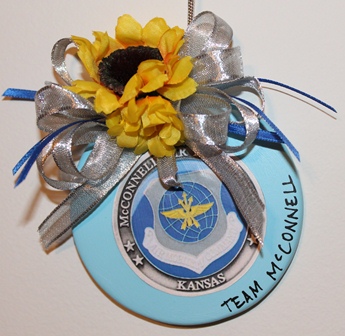
Our McConnells Officers Spouses Club is doing a fundraiser and we wanted ornaments that were specific to our base!  Here is the final product. 


 This one has the front of the McConnell Coin. Because it already said Kansas, I decided to add Team McConnell.  Wichita and a stamp that says Inspired by life is on the back... I thought "how fitting... this is inspired by life!"   The one to the right is my favorite and is the back of the coin.  I added the AF colors with ribbon and the sunflower for Kansas! 


 However this one is my favorite!!  I like the simplicity in it.  The AF Wings and 2011 is done with Shrinky Dinks.... Yes, my friends from the 80's they still make them and they are super versatile....  For instance... to your right are Air plane (or for the sake of McConnell KC 135's) blue and silver beads for AF and made from Shrinky Dinks... Love it.


The last ones I realized that not everyone put up a tree or wanted an "ornament" but these sunflower tins will work as a ornament, say Team McConnell have the plane and AF wings... but also have  3/4" magnets on back... It can be year round!!  The back is also stamped and it says Wichita KS.  I customize with their group or squadron, the year, a special something to remember their time here!!  (even thought there is plenty... like 27 degrees in Dec... yuck! just glad we got through late tornado season!)

My last little project is with the magnets and marbles!!! 


These are 1/2" magnets with the standard "non luster" clear glass marbles.   I used the EK Success border punch to punch the pictures that fit on the 1/2" magnet... (make sure to get the heavier magnet to support the weight of the marble)  and again to make the card to hold them.  I used clear duct tape on the back to keep them in place... I love this project.


Because I don't have marbles the right size for the 3/4" magnet and I didn't like the way it looked with the paper hanging over the stone... I just used my Modge Podge to put a coat on this.  I took my 3/4" single punch to make the card and Creative memories corner rounder to make it smooth. 


Well that is all I have for now!!!  See that is just one of the things that has kept me away from my blog!! 

If I get time I will do more Show and Tell tomorrow!

Until then... safe days, sleepy nights... sweet dreams.
Heather Mae

Saturday, August 27, 2011

Braxton's turn

I began to realize most of my posts revolve around Paige Alise but now I have a great introduction for Braxton!!  He lost his first tooth!  He was so brave when Paige Alise was getting her teeth pulled.  He would shower her how easy it was to put the floss on this tooth!! 
So I noticed he had one that was super ready.  I asked him if he wanted to do this, Sure!!
So we put on the floss!


Did I mention he really slobbers a lot.

So that first pull was..... not as successful as one would hope, it came right off the VERY, VERY loose tooth, but did not get the tooth out!

that made him change his mind!!!  A LOT I put on some Orjel and and was blowing on his face to calm him down.

What a sweet boy.

But now he was AFRAID!!!  poor thing.

He would not move his hands so I could get in there.
First Sister tried to calm him with a great sign.


Paige Alise was videoing to show him later!!  It was priceless!

I was trying to calm him down enough to reason/bribe him

I don't know how well it was working?

Then he let daddy hold him and his hands.... If I could just get past the slobber...On goes the floss again and off again....So I just put the paper towel in his mouth to dry it off...When I take out the paper towel.

NO MORE TOOTH, he didn't even know I had it in the paper towel.

Paige Alise was ready for him with Optimus Prime and a glass of water.


Now they were excited because they are both toothless (not a dragon)

He could not wait to tell his "classmates" I hope I will be able to hear the excitement in his voice as I can see it in this picture.

What a great kid.  He kept crying a little because he was still excited and scared....
However I am proud of him and excited for his First Tooth!!!